

- Technical difficulty: ★★★☆☆
- Server OS covered: NixOS
Nextcloud is very versatile and useful (it supports files, calendars, contacts, and more), and it feels familiar to users coming from Google Drive, Dropbox, etc., which makes it a good choice for starting your journey toward data sovereignty and even onboarding some friends and family.
However, it is not trivial to set up Nextcloud in a proper, reliable way. This guide presents a reliable way to set up Nextcloud:
- Using NixOS, a fascinating Linux distribution where all computer configuration can be done declaratively: you describe how you want your system to function in one or a few files, which helps make the setup more reliable and easier to understand.
- Using Tailscale, which allows you to securely access your home server from anywhere in the world and share access with others and is super easy to use.
- Using Caddy to set up HTTPS easily, avoiding the need to deal with cumbersome self-signed certificates or HTTP warnings.
- With easy-to-use backups to avoid data loss over time.
Prerequisites
- A home server with NixOS installed (I am using NixOS 24.05)
- A Tailscale account
- An external hard drive or other storage device for backups (recommended but optional)
- Basic knowledge of NixOS and Unix in general
Step 1: Set up Tailscale
First, you need to set up Tailscale on your server. Tailscale is a VPN service that makes it easy to connect your devices and share them with others anywhere in the world.
For this step, I will borrow heavily from this excellent guide.
- Add
tailscaleto theenvironment.systemPackagesin yourconfiguration.nix:
{ config, pkgs, ... }:

{
  # ... Your existing configuration
  environment.systemPackages = with pkgs; [
    # ... Your existing packages
    tailscale   # Add this line
  ];
  # ... Your existing configuration
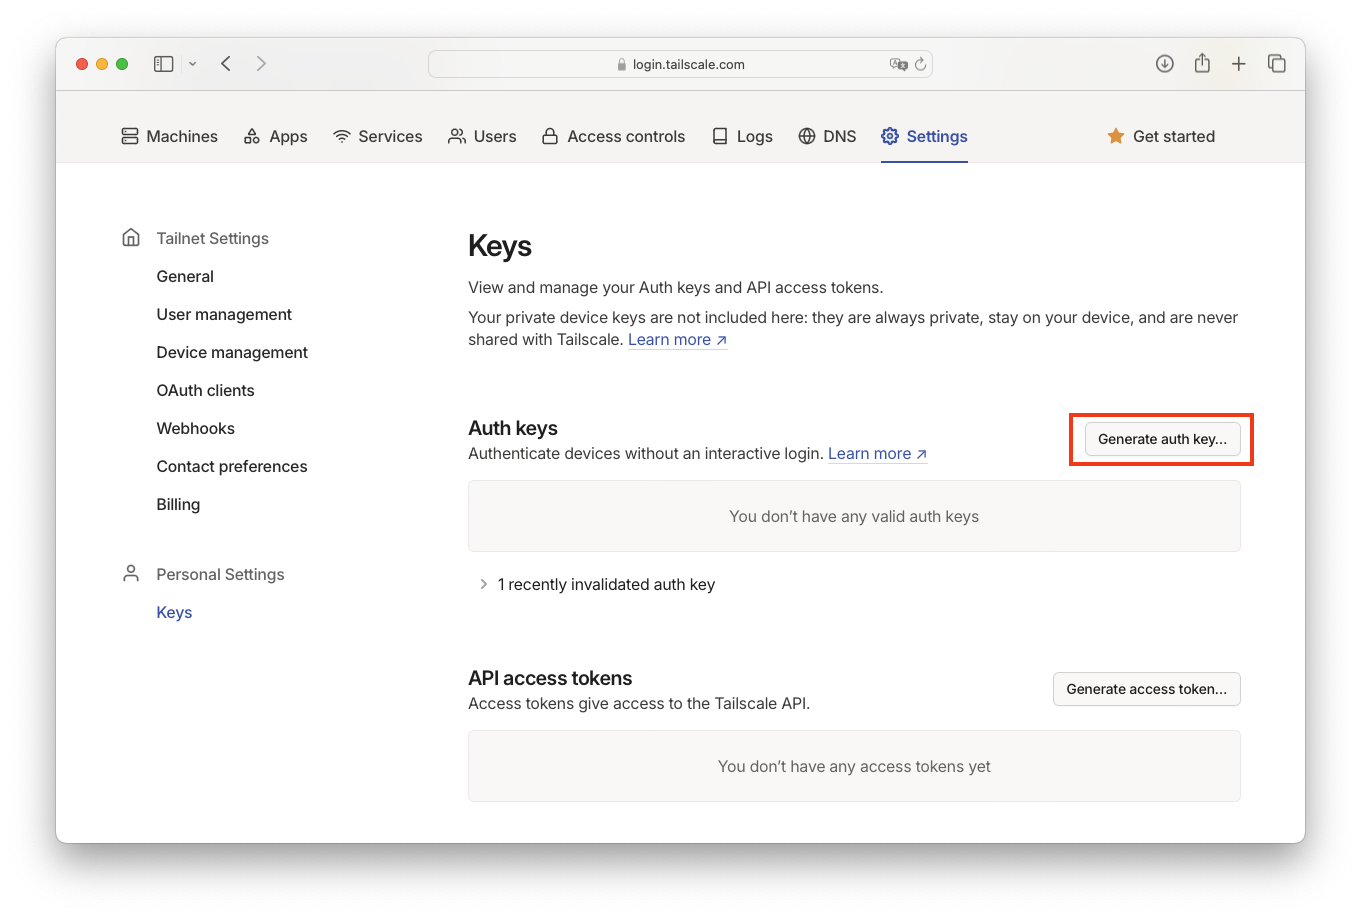
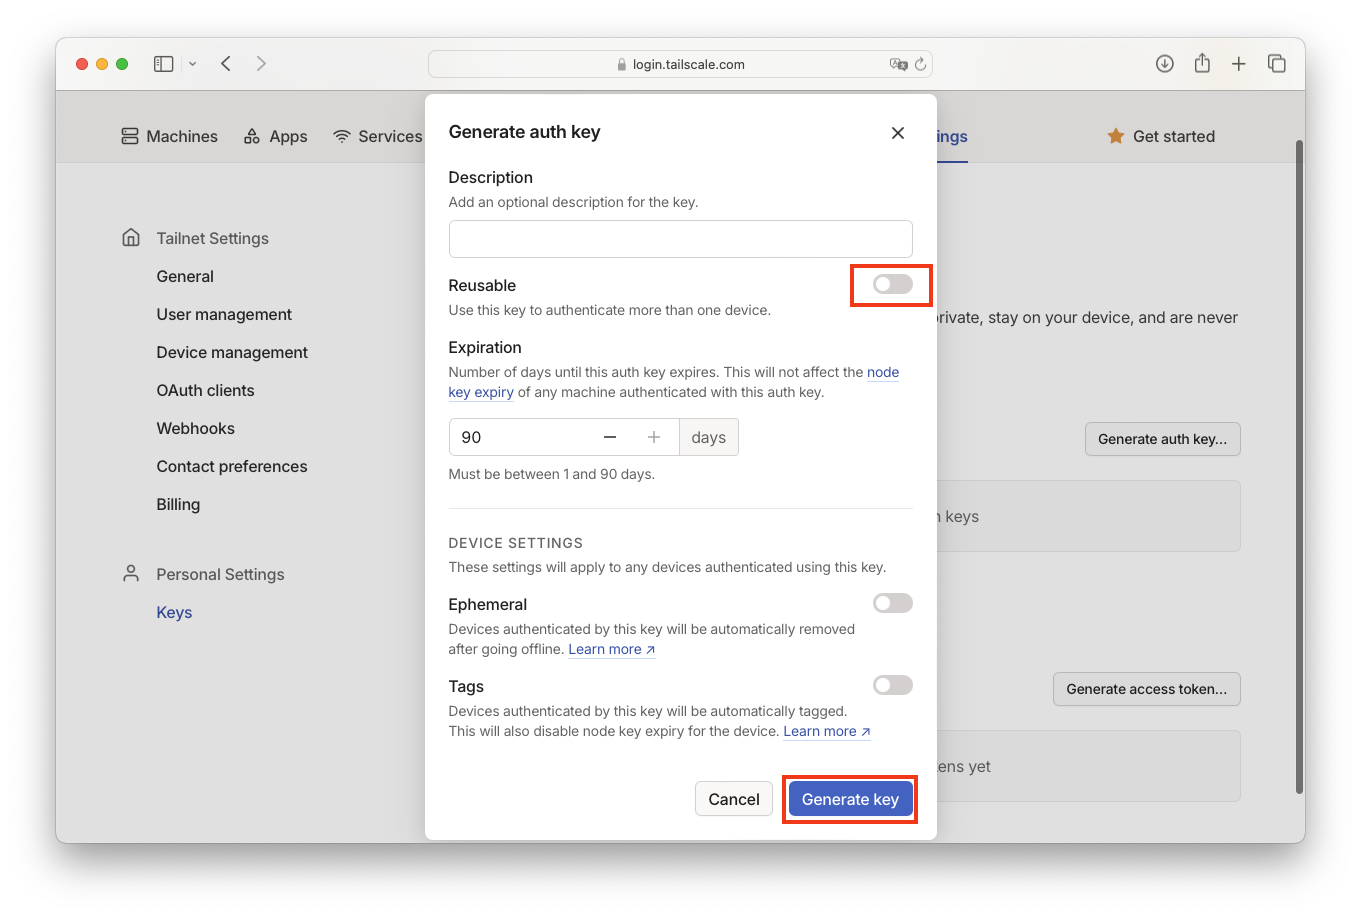
}- Obtain a one-time Tailscale auth key from the Tailscale admin console.
Caution
Please do not generate a reusable key for this purpose; use a one-time key to keep the next step secure.
- Create a new file
tailscale.nixin the same directory as yourconfiguration.nix:
{ config, pkgs, lib, ... }:
{
    # Enable the Tailscale service
    services.tailscale.enable = true;

    # Allow our Caddy service to access Tailscale and automatically fetch and set up our HTTPS certificates
    services.tailscale.permitCertUid = "caddy";

    # Create a one-shot job to authenticate to Tailscale
    systemd.services.tailscale-autoconnect = {
        description = "Automatic connection to Tailscale";

        # Make sure Tailscale is running before trying to connect to it
        after = [ "network-pre.target" "tailscale.service" ];
        wants = [ "network-pre.target" "tailscale.service" ];
        wantedBy = [ "multi-user.target" ];

        # Set this service as a one-shot job
        serviceConfig.Type = "oneshot";

        # Have the job run this shell script
        script = with pkgs; ''
            # Wait for tailscaled to settle
            sleep 2

            # Check whether we are already authenticated to Tailscale
            status="$(${tailscale}/bin/tailscale status -json | ${jq}/bin/jq -r .BackendState)"
            if [ $status = "Running" ]; then # If so, do nothing
            exit 0
            fi

            # Otherwise, authenticate with Tailscale
            ${tailscale}/bin/tailscale up -authkey <PASTE_YOUR_AUTH_KEY_HERE>
        '';
    };
}- Paste the one-time auth key you obtained from the Tailscale admin console in the
tailscale.nixfile, where it says<PASTE_YOUR_AUTH_KEY_HERE>.
Good to know
It is generally considered bad practice to store secrets in plain text in a NixOS configuration file, as they can be easily leaked. However, in this case, since we generated a one-time key, it is less concerning because the key will be invalidated after we make our first connection to Tailscale.
Caution
Please make sure to connect to Tailscale before sharing your configuration file with anyone else, and consider deleting the key from the file afterward. If you need to use a reusable key, you should consider using a more secure method to store it, such as a Nix secret manager.
Step 2: Set up Nextcloud using the AIO Docker image
NixOS offers a way to install Nextcloud using the nextcloud module. However, I found it easier to use the All-in-One Docker image. This way, you can avoid dealing with certain details like database setup, Apache configuration, etc.
- Enable Docker in your
configuration.nix:
{ config, pkgs, ... }:

{
  # ... Your existing configuration
  virtualisation.docker.enable = true;
  virtualisation.oci-containers.backend = "docker";
  # ... Your existing configuration
}- Add a new
nextcloud.nixfile in the same directory as yourconfiguration.nixwith the following content:
{ self, config, lib, pkgs, ... }:
{
    # Define the Docker service for the Nextcloud All-in-One image
    virtualisation.oci-containers.containers."nextcloud-aio-mastercontainer" = {
        # Use the latest Nextcloud All-in-One image
        image = "nextcloud/all-in-one:latest";
        # Options required by the Nextcloud All-in-One image
        extraOptions = [
            "--init"
            "--sig-proxy=false"
        ];
        ports = [
            # Forward the Nextcloud admin interface to port 8080
            "8080:8080"
            # Port 11000 is not explicitly forwarded here. Nextcloud spawns new containers that forward traffic on that port.
        ];
        volumes = [
            "nextcloud_aio_mastercontainer:/mnt/docker-aio-config"
            # This gives the container access to the Docker socket, allowing it to spawn the containers required for Nextcloud AIO to work
            "/var/run/docker.sock:/var/run/docker.sock:ro"
        ];
        environment = {
            # Set the port for the Nextcloud main interface; Caddy will forward port 443 to this port
            APACHE_PORT="11000";
            # Bind to all interfaces
            APACHE_IP_BINDING="0.0.0.0";
            # We will use Caddy for reverse proxying and HTTPS, so we can skip domain validation
            SKIP_DOMAIN_VALIDATION="true";
        };
    };
}
This is essentially equivalent to running the recommended Nextcloud AIO Docker command described here.
Step 3: Set up Caddy for HTTPS
Nextcloud AIO seems to use HTTP or self-signed HTTPS, which can be cumbersome to deal with. We will use Caddy + Tailscale to automatically obtain and renew HTTPS certificates. Luckily, Tailscale works well with Caddy, so we can make this step easier.
- Enable MagicDNS in the Tailscale admin console.
- Enable HTTPS certificate support in the Tailscale admin console.
- Add a new
caddy.nixfile in the same directory as yourconfiguration.nixwith the following content:
{ config, pkgs, lib, ... }:
{
    services.caddy = {
        enable = true;
        virtualHosts = {
            # This will be the address where we will access Nextcloud
            "<HOSTNAME>.<TAILNET_NAME>.ts.net:443" = {
                # Reverse proxy this to port 11000 over HTTP
                extraConfig = ''
                    reverse_proxy localhost:11000
                '';
            };
            # This will be the address where we will access Nextcloud's installation and admin panel
            "<HOSTNAME>.<TAILNET_NAME>.ts.net:444" = {
                # Reverse proxy this to port 8080. The Nextcloud container will try to use a self-signed certificate, but we can safely ignore it
                extraConfig = ''
                    reverse_proxy https://localhost:8080 {
                        transport http {
                            tls_insecure_skip_verify
                        }
                    }
                '';
            };
        };
    };
}
Replace <HOSTNAME> with your computer's hostname and <TAILNET_NAME> with your Tailscale network name. You can find your Tailnet name in the admin console. For example, if my computer's hostname is home-server and the Tailnet name is sparrow-pineapplefish, the full domain name is home-server.sparrow-pineapplefish.ts.net.
Step 4: Import the new configuration files into your main configuration file
Import the new modules in your existing configuration.nix:
{ config, pkgs, ... }:

{
  imports = [
    # ... Your existing imports

    # Add the files we created
    ./tailscale.nix
    ./nextcloud.nix
    ./caddy.nix
  ];

  # ... Your existing configuration
}
Step 5: Apply the configuration
Run sudo nixos-rebuild switch to apply the new configuration. This will install Tailscale, Nextcloud, and Caddy on your system.
You may need to wait a few minutes for all the services to start up.
If you are having issues, you can check the status of the services using systemctl status tailscaled.service, systemctl status docker-nextcloud-aio-mastercontainer.service, and systemctl status caddy.service.
Step 6: Nextcloud GUI setup
- Access your Nextcloud admin panel by going to
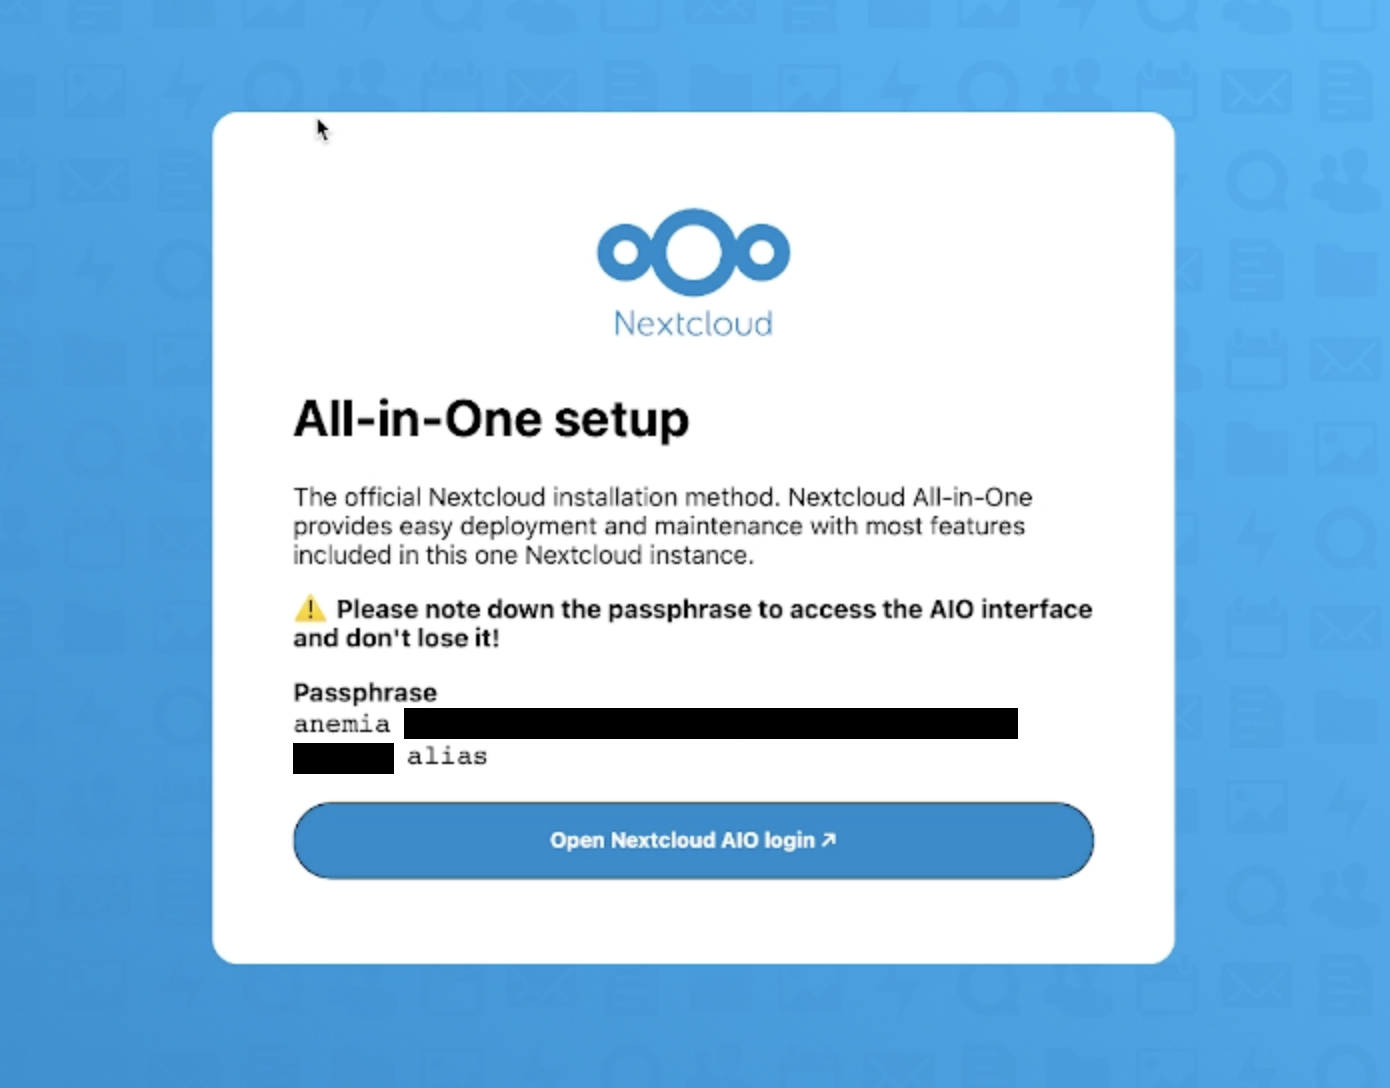
https://<HOSTNAME>.<TAILNET_NAME>.ts.net:444in your browser (replace<HOSTNAME>and<TAILNET_NAME>with your values). - The first screen will show you a passphrase for the admin panel. Copy it and save it somewhere safe.
- Continue and log in to the admin panel.
- Next, you will be asked to indicate the domain you will use to access Nextcloud. Enter
<HOSTNAME>.<TAILNET_NAME>.ts.net, replacing<HOSTNAME>and<TAILNET_NAME>with your values (e.g.,home-server.sparrow-pineapplefish.ts.net). - Then, you will be prompted to install the remaining Nextcloud components. Follow the instructions on the screen. It might take several minutes for Nextcloud to install everything.
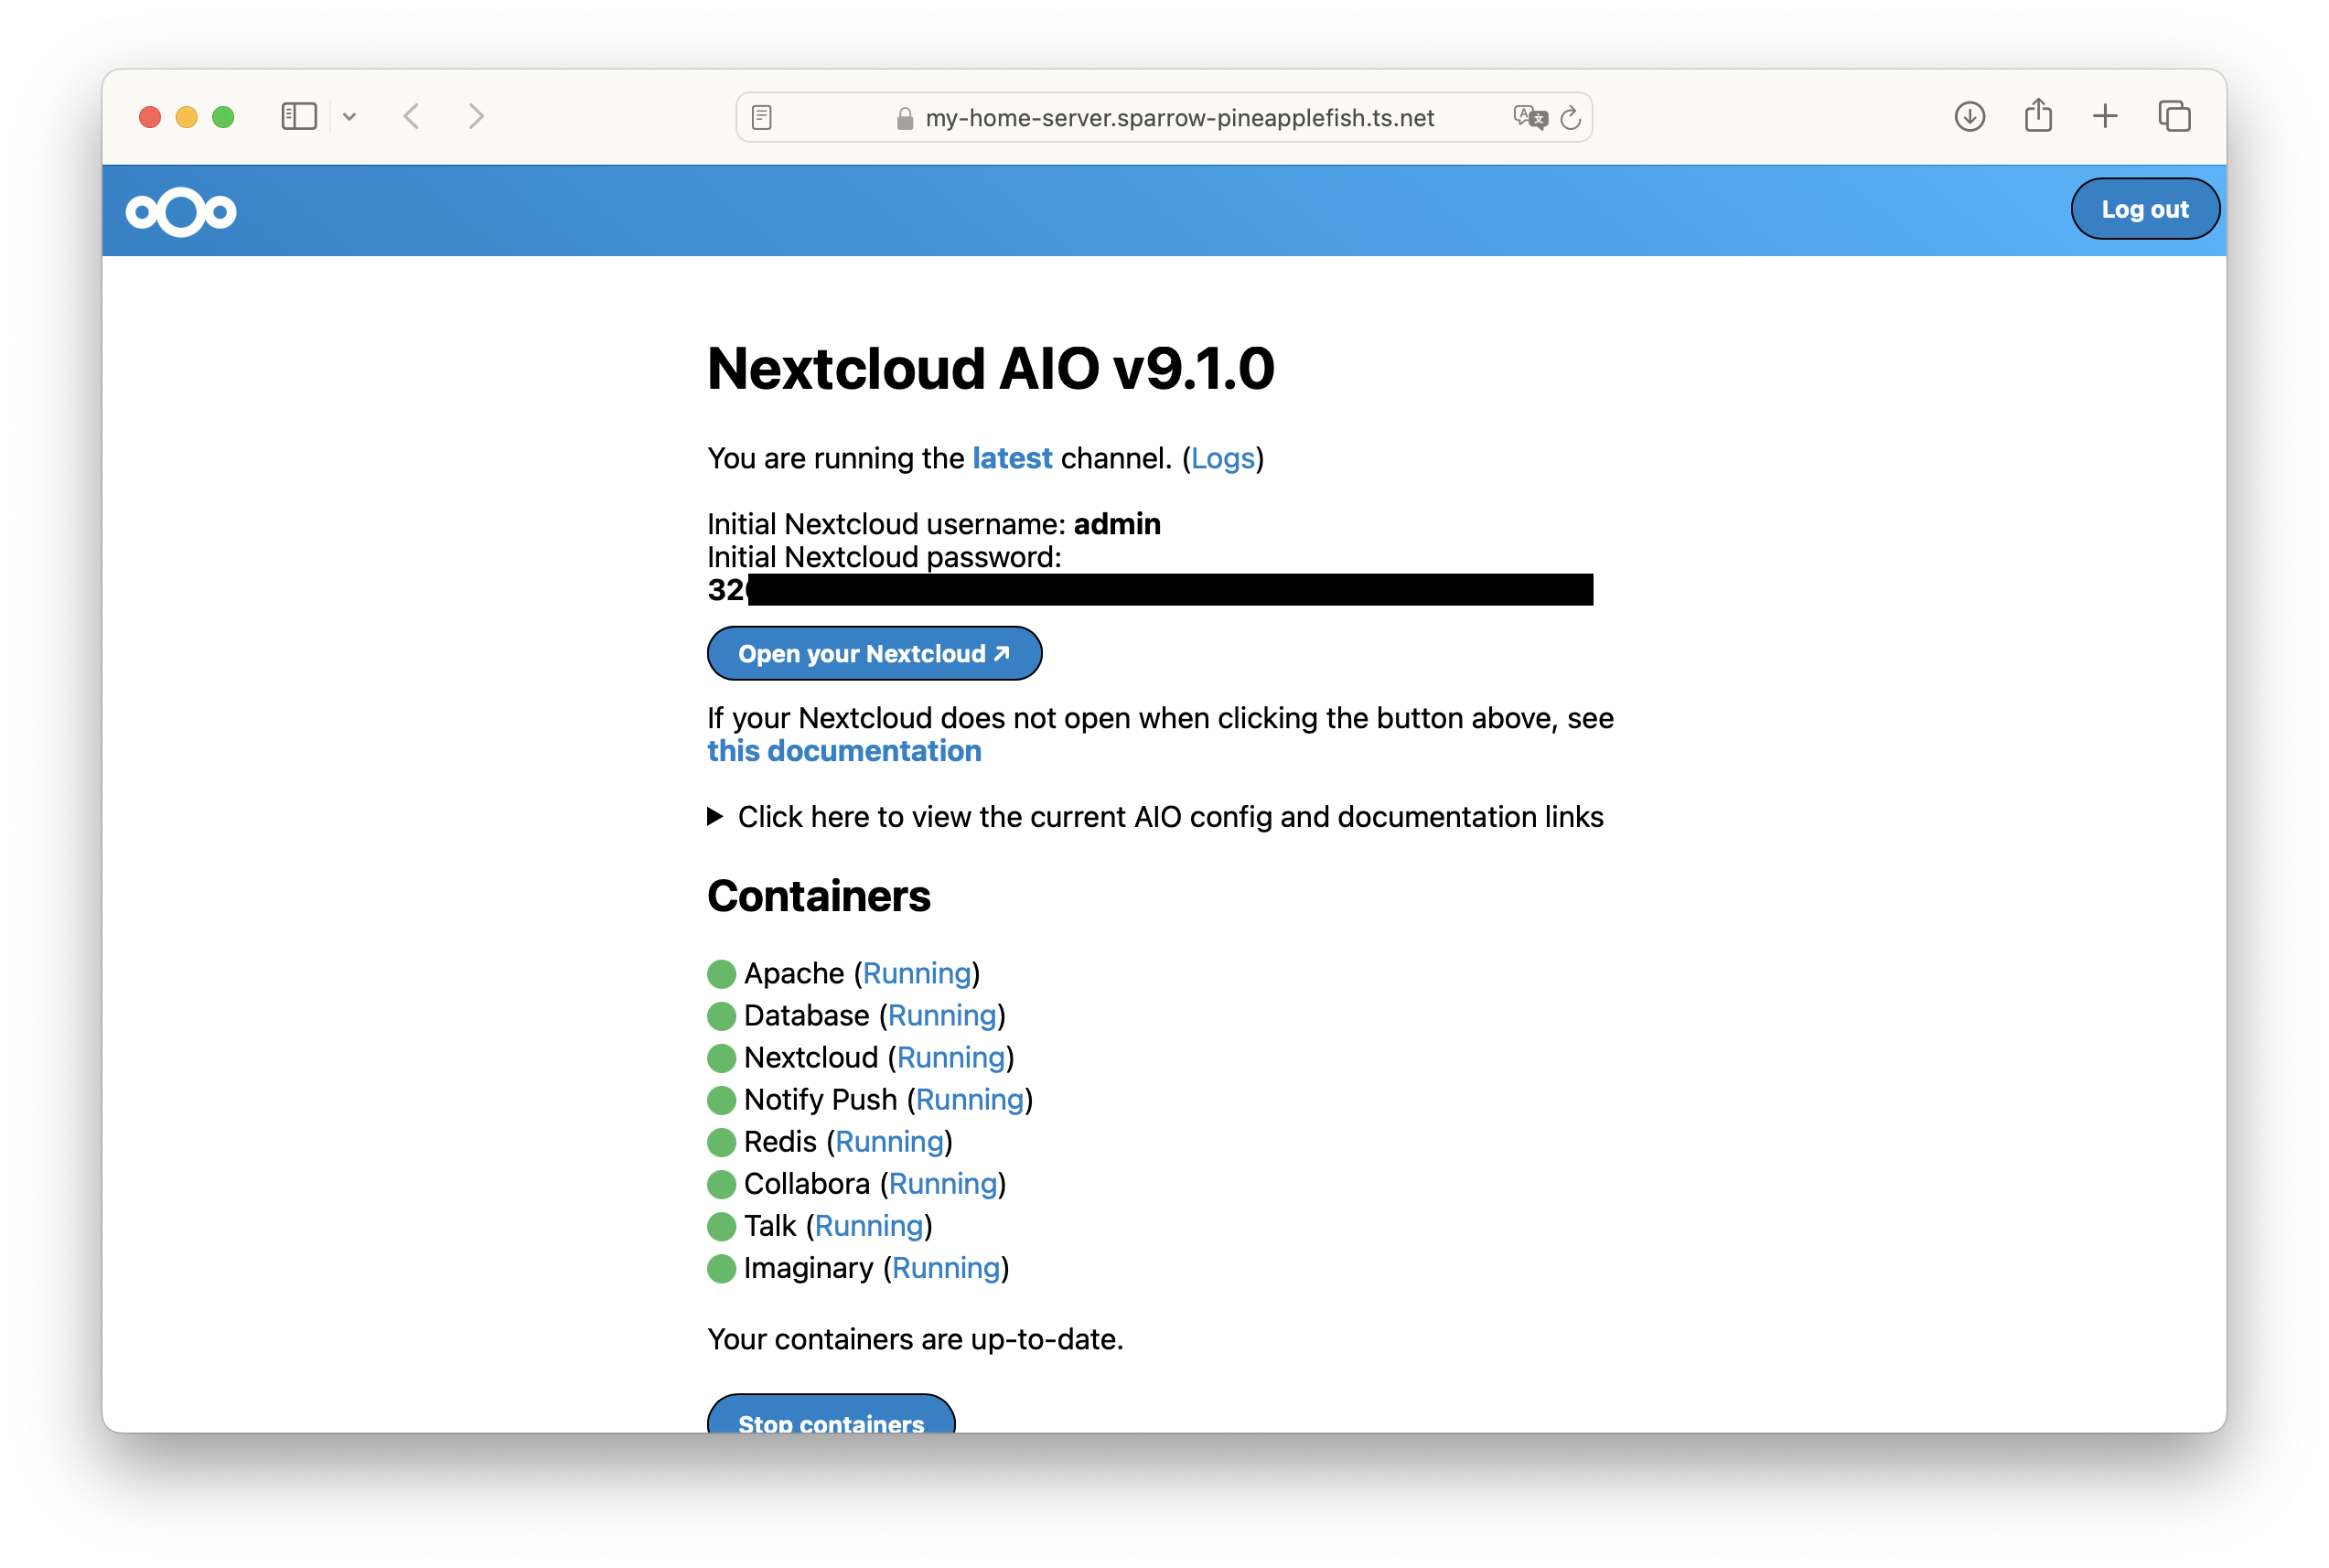
- Once you are done, copy the admin password, which will be shown on the screen. Save it somewhere safe.
- You can now access your Nextcloud installation by going to
https://<HOSTNAME>.<TAILNET_NAME>.ts.netin your browser. Log in withadminand the password you copied in the previous step. - (Optional) You can create other users from within Nextcloud.
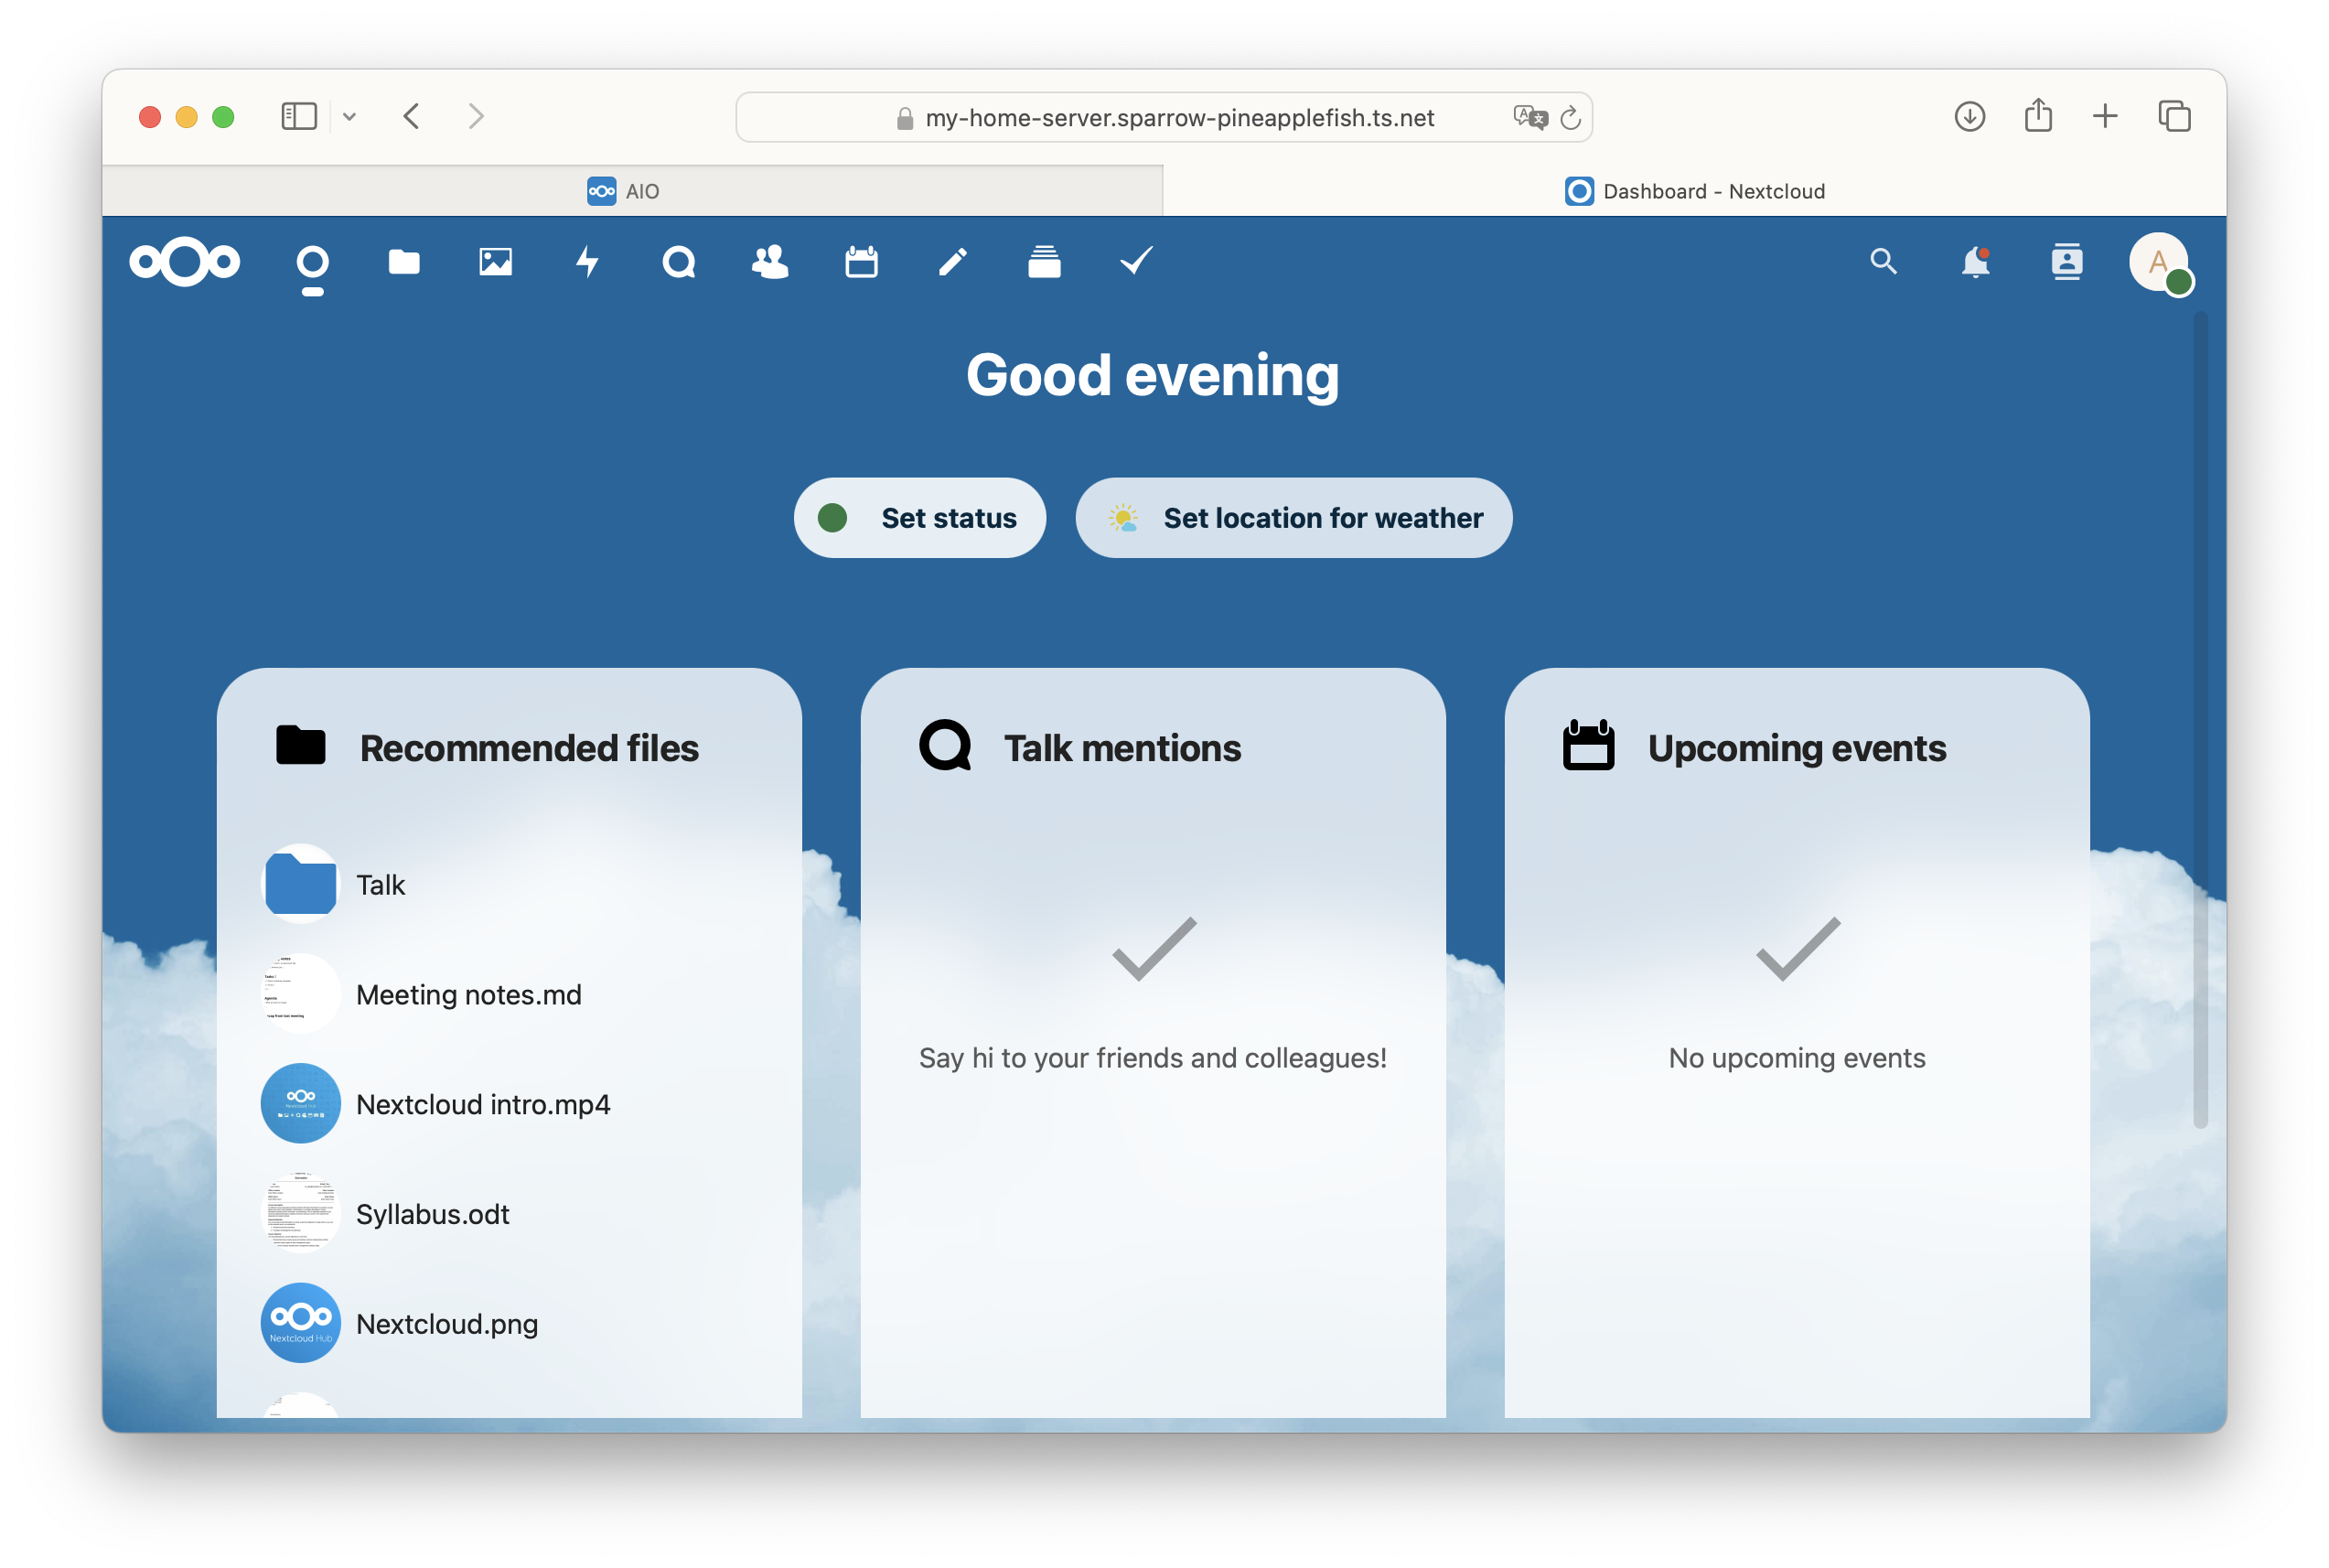
- You are all set! You can now access your Nextcloud installation from anywhere in the world using Tailscale with HTTPS enabled.
Step 7: (Bonus) Set up backups
- Go to the admin panel of your Nextcloud installation at
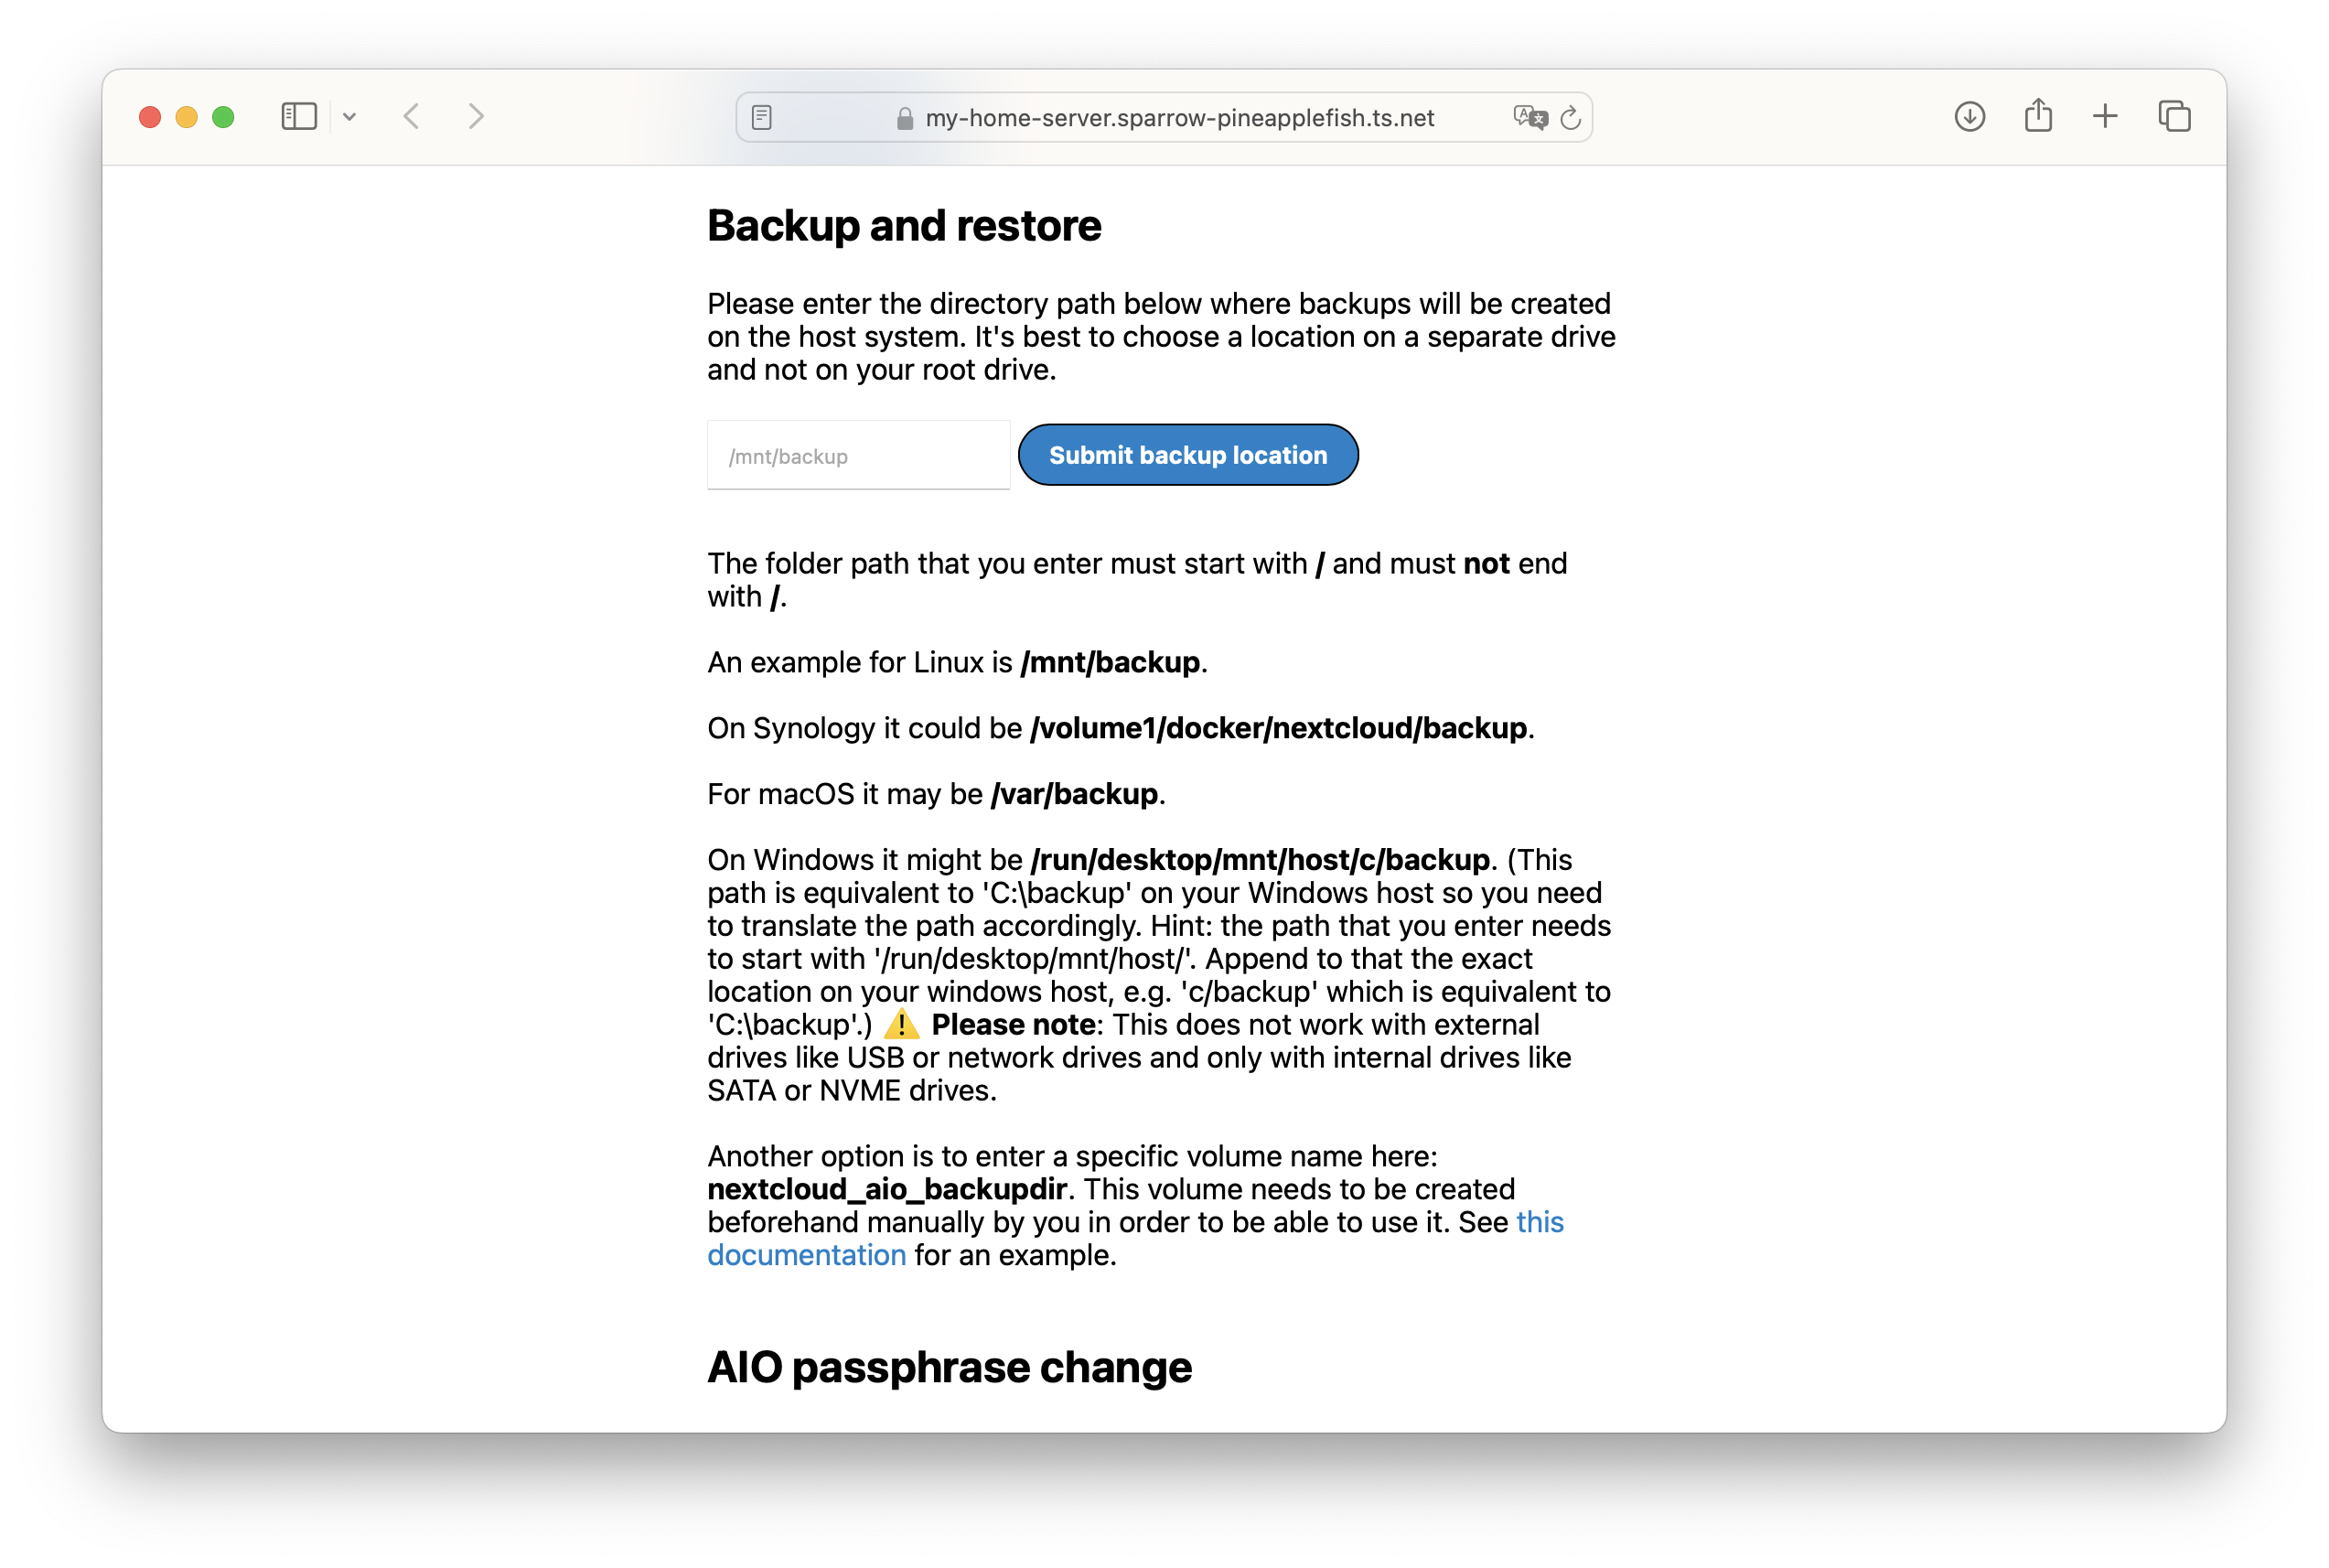
https://<HOSTNAME>.<TAILNET_NAME>.ts.net:444. - Scroll down to the backup section. You can set the path where you want to store your backups. This should generally be an external drive or network location mounted on your NixOS system. Once you enter the path, follow the on-screen instructions.
- Each time you want to make a backup, you can go to the admin panel and click the backup button. Please note that all containers will be stopped during the backup process, so it is recommended to do this during off-peak hours.
Learn more Psst! By the way, this Nextcloud setup uses Borg backup for its backups. If you want to deepen your knowledge of this handy backup tool, check out this guide: Making backups with Borg
Q&A
Where is my data stored?
Under this setup, data will be stored in Docker volumes. To list the volumes, run this command:
$ sudo docker volume ls
DRIVER    VOLUME NAME
local     nextcloud_aio_apache
local     nextcloud_aio_backup_cache
local     nextcloud_aio_database
local     nextcloud_aio_database_dump
local     nextcloud_aio_elasticsearch
local     nextcloud_aio_mastercontainer
local     nextcloud_aio_nextcloud
local     nextcloud_aio_nextcloud_data
local     nextcloud_aio_redis
Each volume serves a different purpose in Nextcloud. If you want to see where files uploaded to Nextcloud are stored, look for the nextcloud_aio_nextcloud_data volume.
To be able to see those files from your system, run:
$ sudo docker volume inspect nextcloud_aio_nextcloud_dataThis will give you information about the volume, including where it is mounted in your system. It will likely be /var/lib/docker/volumes/nextcloud_aio_nextcloud_data/_data.
Something went wrong. How do I check the status of the services?
Checking the status of Tailscale:
$ systemctl status tailscaled.serviceChecking the status of Caddy:
$ systemctl status caddy.serviceChecking the status of Nextcloud:
$ systemctl status docker-nextcloud-aio-mastercontainer.serviceOther questions?
Please feel free to reach out to me! You can find various contact options here: https://danieldaquino.me